The German-Austrian expedition in the best kit of the day on
Nanga Parbat, 1934.

One of the things I have recently realised is there is a big difference between a belay jacket and a bivy jacket designed specifically for climbing. It has only been with in the last couple of seasons that I have actually seen jackets that I consider real belay jackets. The difference to me is a belay jacket is something light enough that you can really climb hard technical ground in after freezing your ass off on a cold belay and NOT get way over heated and "fried" by the end of the pitch.
I still own a bivy jacket. The kind of jacket you would use with a half bag to bivy in ( or bivy in just the jacket) or on Denali for extra warmth with a light bag. But something you'd only climb in on the type of days you really shouldn't be out at all. Windy and cold summit days on Denali or Rainier in winter type of days. I have never used a jacket of that weight any where else.
A belay jacket you'll put on earlier and take off later and then realise you can use it to dry things out as you climb and still not over heat. Your own heat management will be more efficient because of it, if the design and materials are up to the task.
Using my terms, once you start climbing in a true belay jacket, the "bivy" jacket won't see much use. I wouldn't take a jacket that heavy to Denali now. And for many things you might start thinking 1/2 pound of well designed stretchy synthetic insulation might well be be really useful to climb in during some really cold weather...say alpine stuff in Canada's winter.
Kinda a heavy weight hoody (using the benchmark Patagonia R1 Hoody as a reference) with wind protection....more like a belay sweater? To coin a new label.
But really just a climbing specific, sweater. By definition a very breathable and windproof garment with enough warmth to avoid adding a belay jacket for climbing generally.
I've not seen a garment to match that description till just recently. Although Ueli Steck mentioned a similar garment that he used when soloing the McIntyre/Colton last winter.While a great piece for climbing, Mountain Hardwear's original answer was the "Compressor Hoody". But the commercial version wasn't as light weight as what I was looking for. The Compressor Hoody makes a good outer layer and a great belay jacket, just a little too warm to climb in all the time.
The more I climb the more I go backto clothingideas that have been used for the last 75 years or more. The "climbing sweater" is one of them. If you are trying to getto the bare essentials for weight and warmth hard to beat a thin base layer, a insulated layer, wind shell and finally your last bit of insulation, the belay jacket,when it is required.
I generally us a R1 hoody or a lwt Merino wool sweater as a base layer but if it is cold enough I'll had a light weight layer of wool or synthetic under that.
The insulated layer for warmth can be the original soft shell, a simple wool sweater. Or it might be a boiled woolDachstein sweater as pictured in the 1934 picture above.
More likely today it will be some sort of pile in the thickness, wind resistance and breath ability you require, a wind shell combo with pile or a lightlyinsulated soft shell. I've use a similar systems myself until recently.
In the last few years I have almost totally stoppedusing pile insulation and soft shells in the mtns as an insulation layer.
I am back to using light weightwools sweaters orinstead of a heavy wool sweater or pile I have switched to either a down or a synthetic layer that I would consider "sweater" weight. By the looks of what is available today it seems I am notthe only one.
Arcteryx Atom Lt used in cold (-20/-25C) climbing conditions.

As a comparison here is what the weights are of several pieces of clothing I use all the time for winter climbing. Could be a day ice cragging in Bozeman or a full on winter day in the Icefields's at 10K feet or higher.
Belay sweater, insulated shell or just a sweater, your call and your label.
Arcteryx Squamish pullover XL 5.6oz (pure wind shell)
Modern technical sweaters:Patagonia Nano Puff sweater1/2 zip large 11.5oz •60 gm/m²prima loft 1 insulation
Patagonia Nano Puff Hooded sweater large 13.5oz •60 gm/m² prima loft 1 insulation
Arcteryx Atom LT Hoody large 14.3 oz •60 gm/m² Coreloft™ insulation
Arcteryx Atom Hoody LT XL 15.6 oz •60 gm/m² Coreloft™ insulation
Patagonia Down Sweater Hoody XL 15.6 800 fill
Patagonia Down Sweater XL 14.6 800 fill
EB 1st Ascent Downlight Sweater XL 14.4 800 down fill
EB 1st Ascent Downlight Hoodie 1/2 zip XL 15.4 800 down fill
light weightinsulated jackets as a comparison Mtn Hardware Compressor Hoody 19.8oz (Primaloft)
Arcteryx Atom hoody SV 19.0oz
Patagonia micro puff Hoody 22 oz (Primaloft)
Arcteryx Gamma MX Hoody XL 24oz (Polartec Power Shield soft shell)
I've been using an Arcteryx Atom LT Sweaternow for a couple of seasons. It is 10oz lighter than a soft shellMX Hoody and more water resistant from my experience. Big plus is it also breathes better. This winter simply because of thecomfort and warmth of down clothing I have started using the Eddie Bauer Downlight series of sweaters and the Patagonia Hooded Down Sweater.
The use of down insulated clothing while ice and alpine climbing as base layers is clearly questionable. And generally they are not very durable.
Some quick photos to see the sweaters used in combos. Below: Here in -20C temps, no wind,with a Atom LT and a Compressor Hoody used at a belay stance.

Below: Colin Haley using the Patagonia Nano high on Denali while soloing the Cassin.
http://colinhaley.blogspot.com/_06_01_archive.html
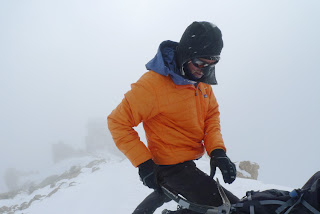
Below:Atom LT again in -20 temps and windy conditions. Atom Lt over a R1 Hoody and aArcteryx Squamish pullover. Just enough insulation if I kept moving.

Below: Same set up again but climbing slowly and cold shadedbelays. Perfect combo with the hood down for the temps which were around -10C.

Below: R1 Hoody here with a Polartec Power Shield Arcteryx Gamma MX Hoody, temps again a balmy -10/-15C with the hoods going up and down as I climbed. No question the Gamma MX is the most durable of the "sweaters" under discussion. It also weights in at 10oz more.

Below: This a combo for really cold weather (-15/-20C)I used for climbing a couple of years ago.On top of a R1 hoody again is a med weighthooded pile pull over jacket, and aPatagonia "Puff" pullover over that. What I am using now is as warm but again half the weight. By the time I retired my Puff it was mostly held together by ducttape. Warm, but not all that durable.

I would never recommend any of these sweaters in a down version for serious climbing. Although I have to say I am using mine there on more and more occasions knowing full well just how worthless they are when wet from the environment or just as likely from perspiration while working hard. Poking holes in a synthetic sweater is bad enough. Even worse with down gear. It will happen if you are using them for ice or alpine. Plan ahead.
A synthetic belay jacket can dry a downsweater out pretty quickly with body heat alone but it still a huge hassle. Best to know what will work or won't for your own use/project before getting into these toodeep..
Besides Patagonia and Eddie Bauer, Mtn Hardware, Raband Arcteryx are making similar products made with down or synthetic insulation.If nothing else the "sweater" in any insulation materialis another option you'll want to be fully awareof in your winter clothing system.
The following are comparison pictures and comments of the current sweaters I am using. Most of it relates to the down versions with a few comments and pictures for the Arcteryz Atom LT.

Above: Blue jacket in this picture is the Patagonia Down Hoody, the gold Jacket a Eddie Bauer Downlight Sweater. Cuffs are virtually the same.

Above: Again Pata and EB..pocket comparisons. Same/same.

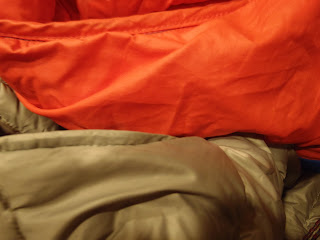
Above: First major difference. Both down versions are simple sewn through baffles. The Patagonia version (red) has a full front lining that adds some warmth and wind proofness. The EB front lining (tan) only covers the lower torso behind the pockets.

Above: Another small difference is the Patagonia version has a draw string at the waist. EB version elastic only.
Above: Sewing quality issame/same form what I can see.

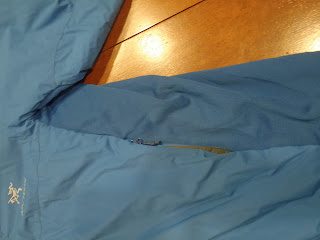
Above: Patagonia's hooded version in blue.

Above: Eddie Bauer's sweater collar in gold.

Above: Eddie Bauer's Hooded version in a dark blue.

Above: Arcteryx's Atom LT hood in lt blue with a red zipper pull.
Above: Atom LT's (in blue) •Polartec® Power Stretch® with Hardface® Technology in the
stretch side panel ventsin the side of the jacket. High tech climbing gear here imo.I really like it for my own use. It is a bit of technology that canbe down rightnippy in a cold wind though. The Atom SV is a very similar jacket but warmer and heavier with 100g fill (instead of 60g) without thevery breathable stretch side panels. But it is very breathable in the under arm area with less insulation there. More of a full blown jacket than sweater though. It is a bit warmer than the Atom LT but doesn't breath as well because of it. Look for a update and comparison on the Atom SV and Atom LT in the nearfuture.

Above: Cuffs, L to R,from the EB, Pata, Arcteryx. Again the Atom LT does it a bit better imo.

Above: For those that wonder...between Patagonia and Eddie Bauer..800 fill down. It is the good stuff. Virtually the same weight jackets but the Eddie Bauer jackets show a lot more loft when measured side by side...almost twice the loft. Which at best is still only 2 inches!Patagonia Nanomuch less. EB has 25% more down fill in any size sweater. 3oz for Patagonia to 4oz in the Eddie Bauer in a medium size men's.

Above: The baffles size on the Patagonia garment are also smaller, so more sewn through seams and over all less insulation because of it. Patagonia really needs that full front lining to be in the same category for warmth as the Eddie Bauer versions.

Finally, while I like the pull overs and they are very warm for their weight it limits their use a bit. For example I use any insulation over my light weight sleeping bags when required. I generally try not to sleep in every piece of clothing I own because it gets to confining.A full zip sweater can add some insulation over the top of my bag. While a pull over sweater can be used in the same manner it is much less likely to stay in place.All of these patterns are very simple and easy to reconfigure. If anyone at Eddie Bauer is listening...I'd like a full zip hoodie asap !
Retail on the Patagonia Down Hoodie is $250Retail on the Patagonia Down Sweater is $200.
Retail on the Eddie Bauer DownlightHoody is $189 Retail on the Eddie Bauer Downlight Sweater is $169
Sale prices? Patagonia is difficult to find on sale.Eddie Bauer is almost easy to buy at a factory story discount.


http://blog.firstascent.com//12/25/update-from-dave-morton-in-k2-base-camp-part-6/
-30 and snowing.. less than 16oz.....Jan


 Sipapu Bridge seen from about halfway down the trail.
 One of the ladders used to descend/ascend to/from Sipapu Bridge.
 The view from beneath Sipapu Bridge.
 A zoomed-in view of Kachina Bridge from the the overlook.

 Kachina Bridge.
 Owachomo Bridge.
 Owachomo Bridge is presumed to be the oldest of the three bridges because it's delicate form suggests that it is has eroded more quickly than the other bridges.