 These are our lights for Christmas. Electric ones and luminerias from our front door. Hard to take photos of lights.
Saturday, August 31, 2013
Christmas Lights
These are our lights for Christmas. Electric ones and luminerias from our front door. Hard to take photos of lights.Our dog the celebrity
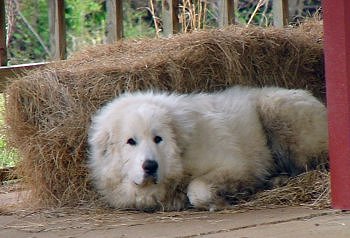
Jasmine is rarely nippy... so when we tried to check her injured foot and she objected, we took her to the vet.
Despite planning to do so, we never got around to taking her on any "going someplace fun" rides. So now she sees them all (rightfully) as "going to the vet" rides, which she was quick to figure out that she dislikes.
The vets' office was overstuffed with people worried that they'd better get something looked at before the long holiday weekend. Other than the horse and a nervous German Shepherd, none of them looked like the two-person job that getting Jasmine to the vet has become.
In a room full of cats and lap dogs, a Great Pyrenees is a celebrity. I think she knew it, too.
When it was finally our turn to muscle her onto the scale, people oohed and ahhed at her 100 pounds. A young boy was properly impressed: "Wow! What kind of dog is that?!"
I was tempted to say, "The kind that likes to run through mud and tall grass and get things stuck in her foot."
It was a long grass seed that had gotten embedded and then a little infected. She got a "take a nap" shot (that she bore quite bravely thank you). The foot was clipped and prodded and balmed, and I was able to brush some mats out of her coat while she was in no position to object.
She woke up slowly, a little scared and unsure. Then she played me like a fiddle, lying on the cool floor pretending that her back legs still wouldn't function. My "poor baby" was apparently just enjoying the air conditioning. Hmmph.
Thursday, August 29, 2013
Walcote circular, via Gilmorton and Kimcote
Led by Barry, with me and Gordon. Pretty flat, good underfoot - mix of arable and cattle country. 7.5 miles. No rain while we were out. At least 26 stiles.
We had a last minute change of plan when we discovered the A43 was closed and that side of Corby was as near gridlocked as I have ever seen it. So we headed back across Corby and past Market Harborough. Thanks to Barry for a last minute alternative to my walk.
I've driven past Walcote countless times on my way to the M1 when heading north, but had never stopped. As so often there is more to these villages than meets the eye of the passing motorist-in-a-rush.
We find a place to park, and set off north along Brook Street, taking a footpath west, to the left just before the road divides. The path soon turns north once more, along the field edge and over a few fields before turning north west and passing the corner of Winterfield Spinney.

The path zigzags a bit through fields north then west, but when two paths meet between Oback and Thornborough Farms we turn right in a northeasterly direction. In the third field we take the left hand option when the path divides. This takes us to the left hand corner of the field, across another one, then along the edge of a third, very smelly today, as it's recently been manured. Good job we don't intend to eat in any posh pub.
We turn left and walk uphill for a few hundred yards along the Lutterworth Road, which is busier than we expected.
The footpath goes off to the right, and heads north north east to Gilmorton. We pass the old motte in a field near the church - no public right of way, so we sneak a peek through the gate.

Our path goes through the churchyard, where we take a break.
 |
| Gilmorton Church |
 |
| An unusual memorial bench. |


The church porch was built to celebrate Victoria's diamond jubilee - the stained glass is clearly Victorian, and we think the carved head above looks like the lady herself.

We leave the church behind us and walk through the village.
 |
| Grey skies today! |
We turn right along the road to Kimcote, and when the road bends to the right we take a path straight ahead. It looks as though there was once a village or similar here - lots of lumps and bumps in the ground, but nothing on the map.

This runs parallel with the road just south of Bruntingthorpe airfield/ proving ground.

We follow the path to the north of The Lodge, and then turn south towards Kimcote, over more fields.

 |
| Kimcote church |
We walk past the church and cross the road to Poultney Lane, through the village and farms. The road turns into a footpath past sewage works, and then gradually leads southwest towards Walcote.
 |
| Globe artichokes - yum! |
 |
| The not-so-swfit River Swift. |
We meet the road, cross the mighty Swift, and at Woodside Farm, we turn left on a footpath which takes us back to the village.
Wildlife note: There are still a few swallows feeding up on the plethora of insects - mainly daddy-long-legs - before they leave for the sunny south.
Tuesday, August 27, 2013
The RAB Xenon jacket

Because I like and use the Atom LT so much and the Mtn Hardware Compressor before it I am always on the look out for first rate lightly insulated (60g) climbing jackets.
The Xenon first came to my attention and a few of my pals a couple of seasons ago. I was pretty stoked...right up till I had a chance to try one on and found the side pockets had no zippers. What was RAB thinking on that one? I actually discussed that with one of the RAB reps earlier this fall. I just figured someone made a huge mistake on that order to China.
But nope no zippers was intentional first time around to save weight. Clearly stopped me and a couple of my friends from buying the Xenon though.
This year the Xenon does have zippers on the pockets, thankfully. Makes them so they don't fill up with snow and you can actually store something in them with no worry of loosing what ever that happens to be.
The RAB party line:
"The Xenon Jacket is a super lightweight synthetic insulated jacket with a very light outer fabric.
The Xenon Synthetic insulated jacket is the culmination of several years hard work with fabric and synthetic insulation suppliers. We have taken Primaloft® synthetic fill and wrapped it up in the lightest Pertex® Quantum® GL 10 Denier fabric that is currently available.
You get a full length garment with a full length YKK zip, 2 hand warmer pockets and a chest pocket and all for just 340g/12oz!!! The whole jacket packs into its own chest pocket and is ideal as a superlight belay or over layer jacket, to be carried in a pack or clipped to a harness.
Ideal for Alpine Climbing, Mountain Marathon,Mountain Walking, Trek and travel and any fast and light activities. What more could you want?"
Sizes: S - XXL
Weight: 330g / 12oz
◦Pertex® Quantum® GL 10D ultra light rip stop nylon outer and lining
◦Light 60g Primaloft® One in body, sleeves and hood
◦Lycra bound hood fits snugly under a helmet.
◦1-way YKK front zip with internal insulated zip baffle and chin guard
◦2 YKK zipped hand warmer pockets and 1 YKK zipped chest pocket
◦Double exit hem drawcord
◦Packs away into chest pocket
◦Short cut
I am obviously not doing any climbing right now. But I am using the Xenon almost every day. I really like this jacket. One of my projects has been to figure out where in my climbing clothing system I can use this one.
It would be a LOT easier if the hood fit over a helmet. It doesn't. Typically that would "kill" any climbing jacket for my ow use. But the new Xenon(with pocket zips) is good enough that I have been looking for places to use this jacket. Here are the reasons I want to use this jacket. First off the materials used, Primaloft One and Pertex® Quantum® make it a lwt package that is hard to ignore. The nice detailing,zipper baffle, corner zipper reinforcements,andthe fleecechin guard you notice. Even the hood has a slick little retaining strap for when it is not in use. The XL size is more like a comfy US large than a XL and it actually fits me very well after the chemo diet. It might be the only jacket in the house that does come to think about it!

If I am not using the hood I don' want it full of snow...the hood retainer strap is a nice detail.

The Xenon tucked into it's own chest pocket with a loop for clipping it to your harness. My XL (call it a roomy US large) weighs in at full 11.8OZ! For once the "stuff" pocket is over size for the jacket and easily goes into this one. The jacket would gointo a smaller (more durable)stuff sack if the bulk is a concern on the harness. Though you are on your own for that.
I may not get the winter use I had planned for the Xenon without a hood that will go over my helmet. But this will certainly be the jacket I throw in the pack for the rest of the year as required. Yep, at under 12oz. I like it, a lot. Really, who actually gives an honest garment weight these days..BRAVO, on that oneRAB!
I like it enough that if they made the hoodbig enough togo over a helmet and kept the zippers onthe side pockets I'd buy one of those too :) After all how much weight is a bigger hood really going to add?
Here is a buying tip....if you find this jacket on sale via the Internet...make sure the version you are getting has the side pocketzips if you require them.
Encased in Ice
What a difference a day makes!
Yesterday was a sunny, bright, beautiful day.
Today is dull and gray. And everything outside is encased in a layer of ice.
But if we have to have dull, gray, icy days, better today than yesterday! Because yesterday I had to take my mom to the doctor for a follow-up exam. That meant a 30 minute drive to Columbia City to pick her up then a 45 minute drive to Auburn. Fifteen minutes waiting to see the doctor, about ten minutes spent with him in the office, and then reverse the drive back home. I'm so glad yesterday was a nice day! And so very glad that I don't have to go out in this mess today!!
 The view from my front door. Doesn't look too bad? Well, there is about three inches of compacted slush, snow, ice and sleet in the drive. I haven't ventured out to the mail box yet. No traction. The pictures were all taken within 20 feet of the apartment and I used the flash to get some definition and contrast.
Looking closely at the trees, shrubs and weeds you'll see there is about a ¼ to a ½ inch of ice covering everything. Not nearly as bad here as it is in Columbia City or South Whitley (where my niece lives and is currently without electricity) or further south. And not even close to what struck the northeast coast last week or the northwest this week. So we are very fortunate here. Most of the schools in the area closed for the day giving the kids an extra day for their winter break.


Yesterday was a sunny, bright, beautiful day.
Today is dull and gray. And everything outside is encased in a layer of ice.
But if we have to have dull, gray, icy days, better today than yesterday! Because yesterday I had to take my mom to the doctor for a follow-up exam. That meant a 30 minute drive to Columbia City to pick her up then a 45 minute drive to Auburn. Fifteen minutes waiting to see the doctor, about ten minutes spent with him in the office, and then reverse the drive back home. I'm so glad yesterday was a nice day! And so very glad that I don't have to go out in this mess today!!
The view from my front door. Doesn't look too bad? Well, there is about three inches of compacted slush, snow, ice and sleet in the drive. I haven't ventured out to the mail box yet. No traction. The pictures were all taken within 20 feet of the apartment and I used the flash to get some definition and contrast.Looking closely at the trees, shrubs and weeds you'll see there is about a ¼ to a ½ inch of ice covering everything. Not nearly as bad here as it is in Columbia City or South Whitley (where my niece lives and is currently without electricity) or further south. And not even close to what struck the northeast coast last week or the northwest this week. So we are very fortunate here. Most of the schools in the area closed for the day giving the kids an extra day for their winter break.
Monday, August 26, 2013
Kings Canyon :: Bubbs Creek Trail
The Bubbs Creek Trail follows the South Fork Kings River to Avalanche Creek and on to Bubbs Creek. A little over two miles long, it is the first leg of the hike to Mist Falls (2.5 miles further), which was my ultimate destination. The trail starts out on the north side of the river. Crossing a suspension bridge gets you to the south side where the trail meanders through meadows dotted with ponderosa pine and cedar trees. Towering peaks rise up on both sides of the river dwarfing everything beneath them.
 A calm section of the South Fork Kings River. The big boulder in the distance is known as the Muir Rock. From this wide, flat rock, John Muir used to deliver impassioned speeches about the Sierra. When referring to logging the giant trees, he said that mankind may as well "sell the rain clouds and the snow and the rivers to be cut up and carried away, if that were possible."
 Narrow spots in the river, along with boulders and rocks in the water, create sections of rough water. I love the sound of the water flowing through these areas.
 There were some areas along the trail that required scrambling over rocks, but for the most part the trail was relatively level with open meadows mingled with forested areas. About three quarters of the way down the trail there were several small streams that had to be crossed using rocks as stepping stones, or simply walking through the shallow, swift flowing waters.
 But then I came to this. The three logs were 8-10 feet long. The water was about 18” deep and very, very fast. I stuck my hiking stick in to the bottom of the stream and the current almost grabbed it out of my hand. It's hard to see in the photo but once you got across the wet, slippery logs there was a downed tree that you had to get over and another 10 feet or so of water (though it didn't look quite as deep) before you reached the other side.
Three times I made the attempt to cross. The logs were of varying sizes. They were slippery. There was no good footing and I'm not good at walking the balance beam! I looked upstream and down for another way to cross but saw nothing. There was no one else around to offer assistance. Reluctantly, I turned around and walked back the way I had come, disappointed but at the same time, savoring the beauty around me.
Along the way back I thought of my options. I could go to the beginning again and take the trail on the North side of the river but that would make the days hike 12.5 miles instead of the original 8.5 and though the view at Mist Falls promised to be nice (a 50 foot waterfall that drops over a ledge into a boulder-lined pool) I decided not to continue on to the falls.
A calm section of the South Fork Kings River. The big boulder in the distance is known as the Muir Rock. From this wide, flat rock, John Muir used to deliver impassioned speeches about the Sierra. When referring to logging the giant trees, he said that mankind may as well "sell the rain clouds and the snow and the rivers to be cut up and carried away, if that were possible."Narrow spots in the river, along with boulders and rocks in the water, create sections of rough water. I love the sound of the water flowing through these areas.There were some areas along the trail that required scrambling over rocks, but for the most part the trail was relatively level with open meadows mingled with forested areas. About three quarters of the way down the trail there were several small streams that had to be crossed using rocks as stepping stones, or simply walking through the shallow, swift flowing waters.But then I came to this. The three logs were 8-10 feet long. The water was about 18” deep and very, very fast. I stuck my hiking stick in to the bottom of the stream and the current almost grabbed it out of my hand. It's hard to see in the photo but once you got across the wet, slippery logs there was a downed tree that you had to get over and another 10 feet or so of water (though it didn't look quite as deep) before you reached the other side.Three times I made the attempt to cross. The logs were of varying sizes. They were slippery. There was no good footing and I'm not good at walking the balance beam! I looked upstream and down for another way to cross but saw nothing. There was no one else around to offer assistance. Reluctantly, I turned around and walked back the way I had come, disappointed but at the same time, savoring the beauty around me.
Along the way back I thought of my options. I could go to the beginning again and take the trail on the North side of the river but that would make the days hike 12.5 miles instead of the original 8.5 and though the view at Mist Falls promised to be nice (a 50 foot waterfall that drops over a ledge into a boulder-lined pool) I decided not to continue on to the falls.
Sunday, August 25, 2013
Dynafit TLT6 for Fall of

TLT6 with the unavailable currently CL liner
My TLT6P came with theCR liners which I really like btw.
Everyoneistrying to figure out the actual weight difference of the CL and CR liners.
Edit:
Turns out some of my comments here were based on a preproduction sample.
For the most part the info is accurate but not always on the minute details. An example is the One and TLT6 buckles are very similar but not exactly the same. The last PF-X liner is close but not exactly the same as the production CR liner. My impressions habven't changed o nthe TLT6 but I strive to be accurate in the deatils so you cna better make up you own mind what is important to you.
If you want more detail worth a look here as well on an additional review of a production sample:
http://coldthistle.blogspot.com//09/the-dynafit-tlt6-ski-boot-shake-and.html
The original review below, written in June after a couple of weeks with the TLT6:
OK, I'll admit it, I am a little pissed.
In late winter and earlySpringof Dynafit started deliveringon something special fewof us hadseen before. That was the TLT 5 ski mountaineering boot.

Finally a ski boot that would climb ice almost as well asa decent ice climbing boot and in the right circumstances may be better than some.

So why am I pissed andpointing all this out? Because as everyone knows or should know by now there are plenty of really good ski boots in the world. And damn few, real ski mountaineering boots. Light weight boots you can ski and climb in without your foot wear ever coming to mind. The emphasis is on the mountaineering not the skiing so much.
Dynafit buckled (forgive the pun) under the pressure to build another ski boot and as a result, for the most partfolded up the TLT5 and put it away.
My suggestion if you want to climb technical ground in your ski boots? Hunt the TLT5s down now and buy a pair while you still can. Either model 5, it doesn't matter.
No question the the newest TLT 6 version is a better ski boot than the original TLT5. But sweet Mary!!!....I wish Dynafithad gone in the opposite direction and built a better technical ski mountaineering boot instead of a a "better" ski boot. The public's voice was clear. There are a lot more skiers than ski mountaineers. Even if they aren't reading about it here on Cold Thistle most asked,"Build us a better ski boot!" And Dynafit did just that.
Now, would someone build us abetter climbing boot that skis well?
Overall boot weight is claimed the same on a 27.5 TLT even with the heavier warmer/better fitting TLT 6 inner boot.
Dynafit's published info fro a 27.5:
1050g tlt 5 P
1050g tlt 6 P
"Chris said...
TLT5Ps. In a 29.0, the TLT6 shell weighs about an ounce more than the 5. The
TLT6 CR liner weighs 2.5 ounces more than the flimsy TLT5 P-TF liner. Total weight
difference is 3.5 oz (100g) per boot." TLT5 P being lighter."
Sorry, I don't have comparable sizes yet to weigh. There are subtle changes in the bootsbut the weigh stayed the same mostly by droppingthe LTW inner boot of the TLT 5.
For most of us skiing is the priority on a $1000 retail boot. Which with the carbon Performance version skiing is clearly the priority. $750 for the Mountain version. If the previous boots are any example both ski much better than any light weigh boot has a right to. They simplyski very well. I found a preference in the TLT5 for no tongue or power strap on the carbonPerformance and use the tongue and power strap on the Mountain version unless I amin really light weight skis. I also found I liked the Mountainversion just a tiny bit better for booting and climbing because it is just a tiny bit softer and a more progressive flex when skiing when all buckled up and strapped in.Both are very good boots.
I found the TLT6 version every bit the ski boot and then some of the TLT5.
Eliminating the forward foot flex makes the TLT6 a better ski boot no doubt. But any hiking or climbingin mixed terrain makes me miss that feature immediately. I suspect having a size 29 shell andjamming my footinto it makes that flex something I notice and like. Others simply riveted the TLT 5toe solid their first season if not week. Those that did will really like the TLT6. Smaller toe profile on the TLT6a result of loosing the hinge.


Buckles have changed some but not always as one might assume. Certainly not lower profile in every case. Hopefully they will stay buckled now on breakable crust of the nasty boot packs or even moderate skin tracks. The fist generation TLT5 hasn't. One of the TLT5's few faults imo. Teh nect generation forward buckle with a "stud" did better. The new buckles are a different profile and shape which should solve the problem. The spring snow conditionsI skied the TLT6 in didn't allow me to test my theory on a "better buckle system" for staying shut. I suspect Dynafit did. I did however use pretty much the same two buckles on my Dynafit Onesall of last season and was pleased with them. Although the One's instep buckle is higher up on the foot and better placed to lock in the heel in I think. If the performance on the One is any example it is a better buckle system on the TLT6 by comparison to the TLT5.
If you are looking for a "better AT ski boot" with an emphasis on skiing,the Dynafit One is a pretty good answer btw. I've been very pleased with the One PX TF when used on my 190cm and longer, 100mm+ skis. No lack of power in reasonable conditions and very comfortable. I have a comparison I have been working on since mid summer between the Dynafit One and the Scarpa Maestrale RS. Short version spoiler? "Both are very good ski boots!" :)
The real find here IMO is the boot Dynafit has yet to build. A stripped TLT6 with a fiberglass cuff, the One's upper two buckle sytem and a Pebax lower. I want that boot!


Instep buckle is larger and has been reversed, then doubled for more adjustment on the TLT6.


New cuff buckle on the TLT6 (lower picture) does wrap around better (one extra hinge point)and offer a lower profile on the boot.

The TLT6 now has a easily adjustable forward lean adjustment in the cuff. Thankfully this is a part you can buy and upgrade your own boots with. Lots of toys to play with on this boot.

TLT5 mid sole or lack of

TLT6 insulated full length insole
I also failed to mention the TLT6 now comes with a soft and a hard tongue at no extra charge. Yellow and green. Easy to tell apart. In my first reviews of the TLT5 Mountain and Performance several years agothat option seemed likea no brainier for Dynafit.
So if you are listening :) How about a Pebax lower and fiber glass cuff TLT6 with a the two upper buckles of a ONE and no extra nonsense. A metal on metal cuff rivet while you are there as well. No tongues, no power strap and a lwt Palau foam liner? Please?
The TLT6 has been widened in the forefoot to enhance thefit for the general public. 2mm on the instep side, and 1mm added to the outside of the boot. I dare anyone to do a blind test and tell me the TLT6 is a wider boot over the TLT5. Helping addressone of the most easily identified complaints from those using the TLT5lift skiing...boot warmth, is a warmer, full length insole has been added. It is easy enough to see.

Inner boot? Late last season I bought a pair of TLT Mountainsthathave virtually the same inner boot that the TLT6 has now. Gone at least in the US is the excellent (IMO) Palau heat moldable and exceptionally light foam liner except for the race PDG version and theDyNA here in North America. Rumors are the RL liner will eventually be avialable. My guess is Dynafit is simply punishing the American's (rightfully so IMO) for complaining toomuch and then adding Intuitions. (Dynafit comment below sums it up "best for this market") Replacing the liner in the TLTP 6 is a slightly heavier (I am saying 100g +/-max) and better fitting (for my feet) heat moldable liner thisseason in both versions of the TLT6. Although Dynafit claims you don't even need heat to mold them. "Just wear them skiing." I am always leery of that as an option. But that seems to actually be the truth from the early reviews I trust. For a $950+ retail boot you would think they could do much, much better. But may be I just don't really understand the technology here. Seriously. It is possible and I could be wrong. because I really like the CR liner. But I also heat molded them.
Did he say?
"more down hill orienteed"
I've used the original Mountain's liner, the original Performance liner, a Intuition Pro Tour linerand now seemingly the newest version ( or at least a very close copy) that comes in the TLT6P. The new lineris heavier by a few grams but is also better in every way but weight for my feet. Likely most feet.
This from Dynafit on 9/16:
- The TLT6s are available in North America with only the CR liner. They are the best for this market, warmer, more downhill oriented, adeguately thermo customizable (in the mean time it's not compulsory to thermo form them, - The fit of the liners is now done without footbed. In this way the skier can adapt the personal anatomy on the soft bottom layer of the liner. This layer changes thickness between the full and half size
Bottom line? TLT6 is an awesomeback country AT ski boot. Better by a fair bit in several ways that the TLT5. Including the new inner boot I think. Smaller over all outer volume. Same weight, wider fit, warmer boot, better buckles. No metatarsal joint to flex on the boot. Loosing the sole flexalone makes it a better ski boot. It is worth repeating again.."better ski boot".
If you really want a climbing boot to ski in buy the TLT5 if you can still find them on discount.
But you aren't loosing much there either with the newest TLT6. I may not like the trend to a better ski boot over "a better climbing boot" butthe TLT6 is without questionan exceptional boot and clearlyan improved TLT5.
Theliner
options? Guess they didn't just drop a PDG or the old P liner in the new TLT6 as the CL liner.
Turns out the CL is very similar but slightly different, withlaces now, more
reinforcement for durability and a bigger flex cuff in the boot shaft.
Thickness of the foam is different (1mm maybe 2mm, I am still checking) as well between TLT and
EVO. PDG and Evo liners are thinner and offer an even easier ankle flex for a
longer stride. But the thin PDG/EVO linermight be an option if you need
more room in your TLT?! Go down a shell sixe on the tLT6 and use the EVO liner? Might be worth a try.

TLT6 liners? CL liner on the left. CR liner on the right.
Photo courtesy of www.mountainski.eu
Great early TLT6 review here as well:
http://www.mountainski.eu/177/several-days-long-testing-of-prototype-of-new-ski-touring-boots-dynafit-tlt6
Interested to see what the foam liner will actually show,if it is ever available in the US...and what else is available in Europe.
Now, how about a real, "mountaineering/ski" boot?
Anyone going to step up and dominatethat market share?

Late '70s Scott ski boot. With a Vibram sole glued on they were a usefulLWT mountaineering double boot that you could actually ski in.
Fog in the Sleepy Hollow Valley

This photo was taken from one of the local fire towers last night just before sunset. It had rained all day and as evening wore on the fog was incredible. An elevated vantage point such as this provided for some spectacular views of the fog as it drifted through the surrounding valleys!
Saturday, August 24, 2013
Static Point Lost Charms ..
Julie and I headed out to Static Point on Saturday to do the only route there we could complete. The 5.9/5.7 A0 Lost Charms. It supposed to be six pitches of 5.7ish climbing with a 5.9 move which can be aided by grabbing an old Leeper buttonhead bolt. (Yipe!)
It was our first time to Static Point, and we found the approach a little vague. (In reality, the approach was pretty straightforward.) Approach beta differs for this crag, but most of it is pretty similar. However, recent work in the area means that you cannot drive the road to the boulders blocking further progress. Now the road ends earlier with high berms blocking progress. This involves more road walking and once you hit the boulders it is a mile in on the overgrown road. The turn off the road to reach Static Point is obvious, but there are a few rabbit trails that we sadly followed just as others had before us. The real trail seems further than it should, and was marked by a cairn, and a pipe 1/4 full of dirt. Other pipes were just decoys.
We eventually made it to the base of the climb which involves a small bit of 4th class scrambling on slabs to get to. Julie led out the first pitch which was supposed to be up and right, and we wound up at the Spencer's Spaceport anchor. I led up and left to get us back on route. The second belay had a bolted anchor at the bottom of the "Pillar". Since it was after noon and we were on a big ledge, we opted to eat lunch. Julie led out on the next pitch up and across the "Bridge Flake" which had a few exciting moves just before gaining the flake. (The topo actually listed that section as 5.8.) I led out on the next pitch which had a barely finger crack on it and set up a belay at the top. Julie got to lead the crux pitch up and over "The Great Flake" and set up a belay after. I followed up to her location and then back down a bit to a traverse left and then up to a set of bolts. There is supposed to be another pitch that takes you to the trees, but we opted not to go, as there were some guys rapping from Online off a dead tree up there. We weren't interested. We rapped Online with 3 double rope raps. (Actually, most of the bolts we rapped on were older hardware, and I was under the assumption that Online had been rebolted.) Perhaps we rapped some other route.
Overall the route was enjoyable on great rock. It was not as run-out as I was expecting. It takes decent gear, and I was happy we packed double of aliens from blue to yellow. (The finger crack pitch I would have liked a third blue alien, but made a nut work.) It is fairly easy for the leader to French the 5.9 move, but as the follower, I would have found it difficult to remove a biner/gear from the bolt after making the move. I also think that it is probably about two moves of each foot, and not just "one move" of 5.9. It is a short steep featureless section just below "The Great Flake." Once through the move, my heart was pumping and remained that way through the rest of the pitch. (I didn't find a large creaky flake very confidence inspiring.)
I didn't have a camera. (Jennifer has it in NJ.)
 Following the Bridge Flake
More of Julie's pics here.
It was our first time to Static Point, and we found the approach a little vague. (In reality, the approach was pretty straightforward.) Approach beta differs for this crag, but most of it is pretty similar. However, recent work in the area means that you cannot drive the road to the boulders blocking further progress. Now the road ends earlier with high berms blocking progress. This involves more road walking and once you hit the boulders it is a mile in on the overgrown road. The turn off the road to reach Static Point is obvious, but there are a few rabbit trails that we sadly followed just as others had before us. The real trail seems further than it should, and was marked by a cairn, and a pipe 1/4 full of dirt. Other pipes were just decoys.
We eventually made it to the base of the climb which involves a small bit of 4th class scrambling on slabs to get to. Julie led out the first pitch which was supposed to be up and right, and we wound up at the Spencer's Spaceport anchor. I led up and left to get us back on route. The second belay had a bolted anchor at the bottom of the "Pillar". Since it was after noon and we were on a big ledge, we opted to eat lunch. Julie led out on the next pitch up and across the "Bridge Flake" which had a few exciting moves just before gaining the flake. (The topo actually listed that section as 5.8.) I led out on the next pitch which had a barely finger crack on it and set up a belay at the top. Julie got to lead the crux pitch up and over "The Great Flake" and set up a belay after. I followed up to her location and then back down a bit to a traverse left and then up to a set of bolts. There is supposed to be another pitch that takes you to the trees, but we opted not to go, as there were some guys rapping from Online off a dead tree up there. We weren't interested. We rapped Online with 3 double rope raps. (Actually, most of the bolts we rapped on were older hardware, and I was under the assumption that Online had been rebolted.) Perhaps we rapped some other route.
Overall the route was enjoyable on great rock. It was not as run-out as I was expecting. It takes decent gear, and I was happy we packed double of aliens from blue to yellow. (The finger crack pitch I would have liked a third blue alien, but made a nut work.) It is fairly easy for the leader to French the 5.9 move, but as the follower, I would have found it difficult to remove a biner/gear from the bolt after making the move. I also think that it is probably about two moves of each foot, and not just "one move" of 5.9. It is a short steep featureless section just below "The Great Flake." Once through the move, my heart was pumping and remained that way through the rest of the pitch. (I didn't find a large creaky flake very confidence inspiring.)
I didn't have a camera. (Jennifer has it in NJ.)
Following the Bridge FlakeMore of Julie's pics here.
Friday, August 23, 2013
Picacho Peak State Park
Located forty miles north of Tucson, just off of Interstate 10, Picacho Peak State Park is where I spent the night after my brief visit to Saguaro National Park. It is a lovely place but I was most delighted to find that it had showers! With hot water! Heavenly.
 The peak for which the park is named, Picacho. The description of the trail to the top was listed as strenuous. Having driven most of the day and arriving just an hour before sunset, I didn't quite feel up to a strenuous hike. I did take a little walk around the campground though.

 Photographs taken on March 15, ...
The peak for which the park is named, Picacho. The description of the trail to the top was listed as strenuous. Having driven most of the day and arriving just an hour before sunset, I didn't quite feel up to a strenuous hike. I did take a little walk around the campground though.Photographs taken on March 15, ...
Subscribe to:
Posts (Atom)