Saturday, September 28, 2013

Phend-Fisher Family Reunion Ledger (1937)

The 28th annual reunion of the Phend & Fisher families was held in the Nappanee Community Park, with 35 present.

It was moved and seconded to retain the same President and Sec'y. Treas. (motion was carried)

Entertainment Com.
Anna May Thornton - It was decided to have the reunion at Nappanee again next year.

Birth reported -
Sharon Elaine Pletcher. Father Warren Pletcher.

1936 Bal .18
Collection 1.75
[balance] 1.93
Park fee 1.00
Bal - .93
Notices .93
[balance] .00

Signed
Bob Bechtel
Sec'y Treas.

A Classic View


Fog rolls through the Golden Gate.

Friday, September 27, 2013

The Age of Ascent

Ian Elliottis a modern sport climber.

Heclips bolts, he grabs draws, he uses tricks, sticks andkneepads.


But he's no slouch.

Tenacity like a cockroach. He comes back from injuries again and again. The kind of stuff that would stop someone half his sons age.


He's known almost exclusively as Old Ian. Not sure how he got that name.


Style:Gandolf meets Harry Butler. Rocking these Arthritis support kneepads in blue, poly pro underwear in black, and red polar tech beanie by Hot Tuna.

He gets the covetedjjobrienclimbing tick.


Ian channels Bhagwan Shree Rajnessh as he works the moves on "Weapon of Choice" 27, Coolum Cave.Spooky, huh?


I somehow feel proud that the cave has such a climber as Ian, as though I gain some prestige just by association.Climbers, I have to confess to being ageist. I know, coming from me! Old people, they gamble, they take drugs, they drive like maniacs.But then there are exceptions that give us an alternative model.


I could watch it again and again:The scene where this kindly old gentleman shows a Forester load ofbumpy boyshow to do the route they've been dogging all day. And then offers to retrieve their draws.Priceless.


Grow old, stay strong.jj


Thursday, September 26, 2013

Head to Toe


It struck me that there seemed to be at least as much focus on clothing and accessories at Interbike this year than on bicycles and components. Not that I am against cycling clothing. I support the idea of looking nice and being comfortable on the bike. That said, I felt that for all of its variety, most of the clothing exhibited was deeply unsatisfactory. Put simply: too much embellishment, not enough substance. While I obviously appreciate aesthetics, I wish there had been a greater focus on construction, fabrics and other meaningful aspects of garment and footwear design. Still I'd like to mention some tidbits from the show that I found noteworthy, interesting, or funny.


Pace Cycling Caps
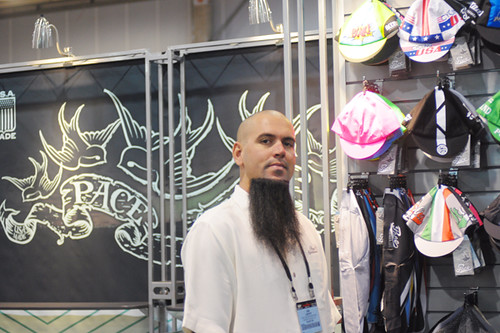
There were lots of manufacturers exhibiting cycling caps, but not all caps are created equal.While some consider the cycling cap to be a novelty item, for me it performs the very real function of soaking up sweat and keeping the sun off my forehead (applying sunscreen directly to the forehead makes it leak into my eyes). And a good fit is key, so that the cap does not shift under a road helmet. For me that means 4-panel construction, which not many manufacturers seem to offer. Happily, one of the first booths I happened to walk by was that of Pace Sportswear - the makers of my favourite cycling cap (white cotton, 4 panels, rainbow stripes, perfect!). Lots of bike shops carry Pace caps. They are simple, classic, inexpensive, and happen to fit my large head just right. What I didn't know was that the caps - all Pace clothing in fact - are made inhouse, in California. I also did not know about their background. The Colombian-born founder and cyclist, Jorge Saavedra, began making custom caps for Campagnolo in 1978. Does this make them one of the oldest cycling cap makers still in business, I wonder? In any case, it was great to meet the manufacturers of one of my favourite pieces of cycling clothing.


Swrve Cycling Caps

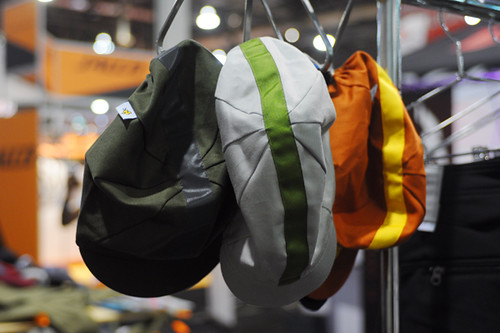
Swrve had another flattering 4-panel design on display in a variety of muted colours and with the interesting addition of reflective ribbon. These too are California made, at prices that won't break the bank.


Swrve

I was intrigued by the experimental fabrics at Swrve: tissue-thin summer weight wools, as well as silk and linen blends. In my experience, it is fairly difficult to come up with a truly summer-weight wool blend for a hat, but this feather-light fabric felt promising.


Carradice Cape
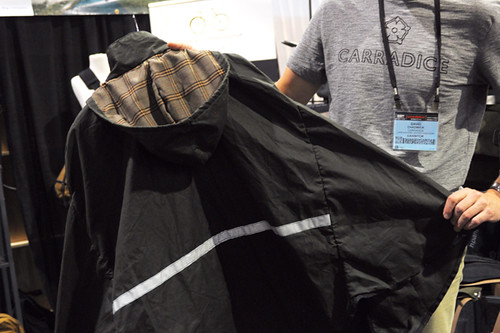
Moving downward, one trend I am noticing as far as cycling clothing for commuting, is a growing mania for capes and cloaks (see Iva Jean, Cleverhood). The waxed cotton cape from Carradice is classic and beautiful, though on the heavy side. While I appreciate the capes aesthetically and envy those who wear them gracefully on and off the bike, frankly I am terrified by their expanse of fabric and never fail to get tangled in the ones I try. I would love to see more normal, lightweight, breathable raincoats adapted for cycling.


Brooks England

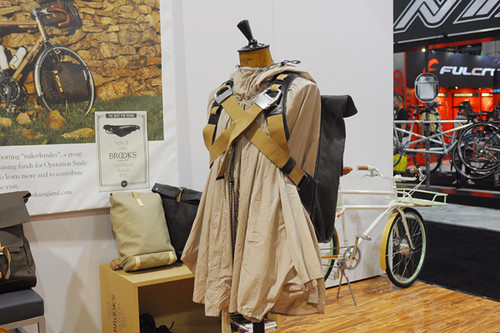
The dramatic, paratrooper-esque cloaks in the Brooks booth were certainly show stoppers, and I've just learned that their new Cambridge Cape retails at $160. Other outerwear pieces are pricier. Generally speaking, I must say there has been some behind-the-scenes backlash against expensive outerwear. I appreciate the work that must go into the high-cost products, and I appreciate them being out there as conceptual/ inspirational pieces. But there need to be more options on offer that are a step below the haute couture price range that much of the classic cycling rainwear seems to fetch.


Swrve Crotch Gusset!

Swerving back to Swrve on the theme of trousers, they were the only manufacturer I saw displaying cycling pants with a proper crotch gusset. I might have to try a pair of these soon, as well as their cordura-blend jeans. As far as clothing for transportational cycling, Swrve definitely impressed me the most overall with their combination of fabric innovation, technical features (tailored, vented jackets) and "this looks like normal clothes" aesthetics.


Riyoko Urban Bike Wear

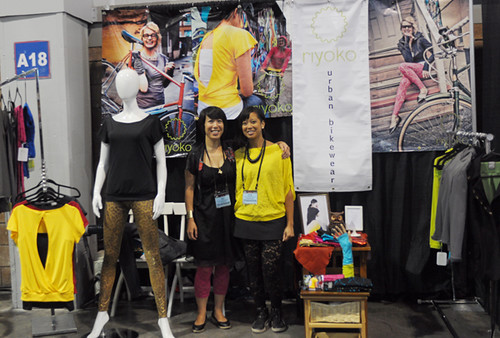
Examplified by the Riyoko booth was the trend for colourful, "spunky" bike fashion. I notice that ideas of women's urban bike wear tend to involve leggings and arm warmers. And I get it: Leggings are stretchy; arm warmers add versatility to a short-sleeved outfit. But it's a very young look and few grown women can wear this to work unless they are in the creative or fitness industries, or maybe IT. Still, I like their lace leggings and tailored jacket.


Capo Women's Line

And as far as women's roadie clothing, the brand that stood out for me was Capo. The new women's line looks nice enough (black, white, navy, or Giro-pink with subtle colour accents), but what got my attention were the technical features. For starters, Capo is one of the best at preventing "sausaging" effects at the waist and thighs by using wide elastic bands. Further, there is no polyester in the tops or shorts, only nylon/spandex blends - which means those sensitive to polyester but not lycra (more common that the other way around) can wear them against the skin. But my curiosity was really peaked by the description of the abrasion-resistant weaves used in the new line. I have a baffling talent for destroying my cycling clothing, especially shorts, by snagging it against everything in sight. So something like this - if it really works of course - would be pretty useful.


Capo Women's Line

Also - and probably this is just the contrarian in me, as I've never been a fan of pink - I found myself drawn to this pink cycling jersey. The colour has now gone so dramatically out of favour with women's cycling clothes manufacturers, that no one wants to touch it. Yet Capo takes a stab at it - and manages to make the pink look aggressive rather than girly. But colour aside (it is also available in black and white in fact), the jersey is interesting in that it is made of a complex mesh that feels like all holes when you have it on, yet does not look transparent. I am curious how it would feel in comparison to the lightweight wools I now wear.


Cafe du Cycliste

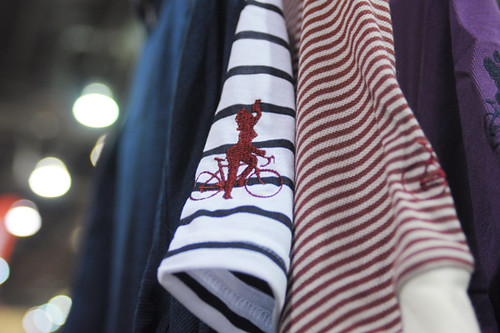
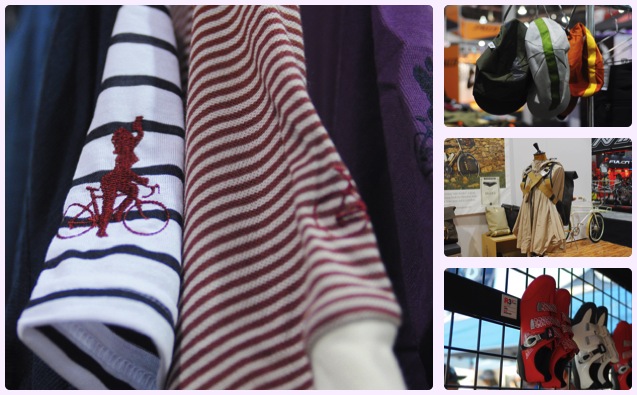
Also represented was the trend for what I would call hybrid road/urban wear - roadcycling clothing that is made to kind of, sort of pass for European street clothes. Some of the merino and striped jerseys from Cafe du Cycliste looked rather nice, but my concern is that the urban touches will diminish the garments' preliminary function as roadcycling clothing while still not truly passing for "normal clothes" off the bike. While I haven't tried anything from Cafe du Cycliste specifically, I have some samples from VeloBici and Vulpine that I will review in that context soon.


Giro Polka Dot Theme

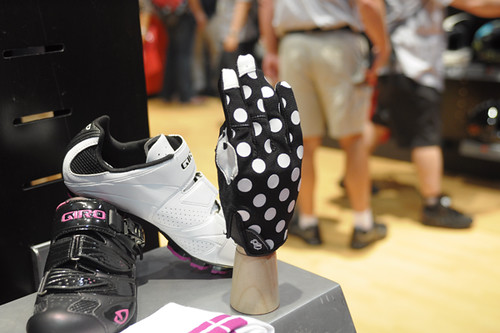
As far as cycling gloves, the trend I saw - at least for women - was for a greater selection of lightweight full-finger gloves, such as these from Giro's new women's line. I like the idea, because the tips of my fingers always manage to get burned or scraped somehow when I am on the bike for long, but in the past my hands have always gotten too hot in full-finger gloves. I'll try some and see if they do any better than the ones I tried 3 years ago.


Giro Polka Dot Theme

And if you are wondering about the polka dots, this was actually a huge aesthetic theme at Interbike. Also, stripes. And the colour purple. It's as if manufacturers all brainstormed and came up with the exact same answer to the question of "How to replace pinks and florals in women's clothing?" But I tease. To be honest I actually like the stripes and polka dots. As far as the purple, it depends on the shade.


Darn Tough
One clothing trend that was impossible to miss was the colourful explosion of cycling socks. It seems like every sock manufacturer suddenly decided to introduce a cycling-specific design, and at the same time every cycling-related company decided to add socks to their line of accessories. Everywhere I looked, I was greeted by socks and more socks, stunning in their variety of fabrics, textures, thicknesses and colours. Cycling sock lovers rejoice, for these days we are truly spoiled for choice.


Darn Tough
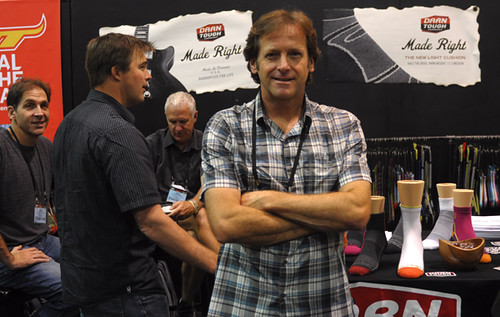
As far as wool cycling socks, the manufacturer that truly wowed was Darn Tough - made in Vermont, USA. That was just a small swatch of their sock display in the previous picture; their new line of lightweight cycling socks is impressive.


Save Our Soles Cycling Socks

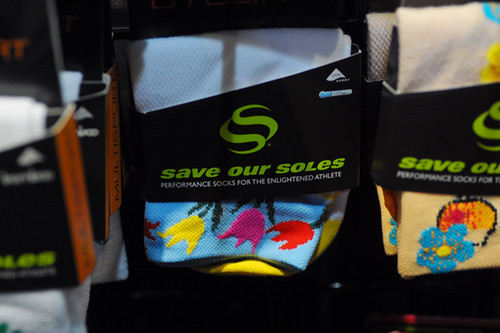
More aggressive in its styling, Save Our Soles presented a floor-to-ceiling display of cycling socks in every wild pattern imaginable. This company is like the Hallmark card of athletic socks.


Save Our Soles Bottle Guard

They also displayed these wine bottle guards. You know, for those times when you're carrying a wine bottle home from a club ride in your bottle cage.


Velo Orange Socks

Promotional socks were popular as well, including these new wool-blend ones from Velo Orange.


Compression Socks

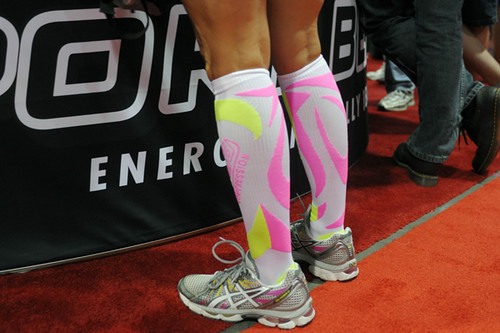
One trend that I hope someone could explain to me, is the compression socks. People were wearing them, in all sorts of crazy colours.


Compression Socks

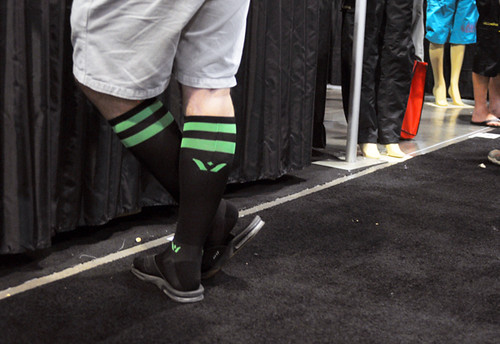
With otherwise normal outfits. While walking around the floor of Interbike. Thoughts? Seriously, I am not making fun - I just want to understand!


Outdoor Demo

As far as cycling shoes, everyone was talking about the new Fizik line, with its streamlined looks and feather-weight construction. With my romance with clipless pedals in full swing, I am open to being swept up by some fantastic new shoe. But the thing is, my Mavic Cyclo Tours weigh 360 grams, cost $100, feel great, and are in great shape after nearly 6 months of wear - including getting soaked in the rain and caked in mud several times. That pretty much keeps my eye from wandering.


Interbike Fashions
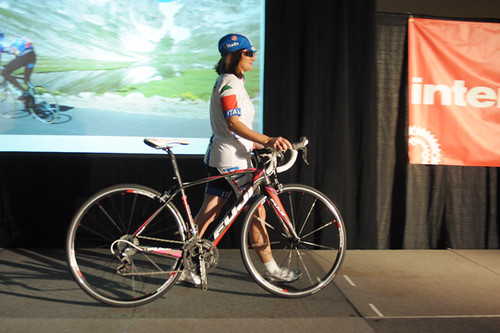
While I've probably confused and frustrated some of you by mixing up commuter and roadie attire, I was impressed to see that Interbike kept them separate. While last year there was one fashion show (here is my coverage of it), two separate shows were held at this year's event: one for "city fashions" (commuting) and the other for "technical fashions" (road and mountain biking). I stopped by the latter, and it wasn't bad: The announcer named the manufacturers, and the models' backgrounds were nicely tied into the narratives (I think all were racers or endurance riders). I think that having separate shows for these categories was a very logical solution.


Interbike Fashions
It was also neat to see the designer Sheila Moon modeling her own clothes.


Interbike Fashions

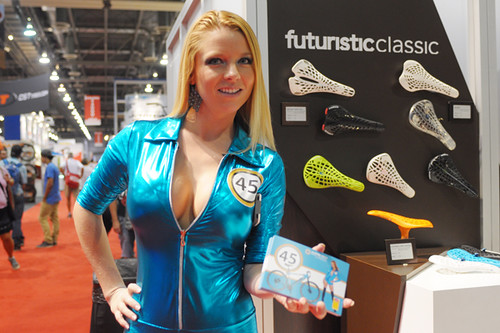
Of course a discussion of clothing at Interbike would not be complete without acknowledging the Vegas Glamour Girls hired to promote some of the products. They were very friendly, very nice to me, posing for pictures and doing their job. Reactions to these ladies (from both genders) were mixed - some were drawn to them, others embarrassed to go near them. The outfits ran the gamut from string bikinis to shiny rubbery rompers. Oh and compression socks with heels! Well, that's Interbike and Las Vegas for you.

Tuesday, September 24, 2013

Exit Exploration ..

Adam and I took a trip to Exit 38 to explore extending/expanding routes on the Easy Street Slab. The forecast was to be in the 60°s and mostly sunny, but when we arrived in the parking area, there was a light mist falling. We opted to at least go for a hike presuming if the weather got worse, we wouldn't be climbing.

The weather didn't get worse, and after the twenty minute hike we were looking at the wet slab.


Adam said he would lead up the least wet route which was ES1, or third from the right. We geared up. Transitioning from muddy ground to rock was a bit sketchy, but he made the lead and then traversed to the anchor for ES2 before bringing me up. Fortunately the slabs are fairly easy, so the water did not affect us too adversely.

At the belay it was perhaps raining a bit harder now, but still not a full soaking. We couldn't really see anything that we wanted to look at, so I led out on the next pitch to the upper chains. There were a few wet bits that I did not feel comfortable on and I even placed a cam on the upper section to protect a wet move to get to a bolt. I got to the top chains and brought Adam up.

We were cold and wet, but now was the exploration time. I had Adam belay me out right just to check out the terrain. I had no intention of doing a lead in the rain. The terrain above looked dirty and not worthy of bolting. The terrain further to the right (where I did not venture looked a bit better.)


I came back to the anchors and belayed Adam up a bit. We both agreed that the terrain immediately above us did not look promising, but there was a knob above that looked fun. We were cold and starting to get wet, so we set about rappelling.

On the rappel I checked out the right side where there was a decent looking corner.


There was a set of anchor bolts above the corner that may have been used to develop the crag. We considered the possibility of extending ES3 with a short second pitch to those bolts. But there wasn't as much there as we wanted to be or anticipated. It was an interesting outing at least.

Leaving

Sunday, September 22, 2013

Oh, My!


Heading west on U.S. Hwy 82, near Hope, New Mexico. December 5, ...

Black Diamond Express Ice Screws?

Jeff Shapiro climbing hard,fully kitted inBD with a rack of Express screws


I have a couple of drafts started in the blog about eating my words on gear. Hadn't finished any of them of course because it is really hard for me to convince ME, I am ever wrong :) Weak, I know, but here isthe first.


Few that don't know me can understand the time I have spent at my desk or at the workbench in the shop measuring, sharpening or just examiningice screws. A couple of my climbing partners have seen me wind in dual screws at placements on climbs and wondered just how much of a knuckle head I was going to be that day. Andif I could just get on with it!If I am placing dual screws it is generally because I am scared but I can go with the gear testing story when pushed.


But, with all the playing around I at least *think* I know something about ice screws.


When you understand what makes the teeth bite and how much each screw weights and why there isn't much else to understand. Simple pieces of gear really...well pretty simple anyway.


So you have to understand that I know Black Diamond has a better set of teeth than most anyone making screws. And no question the Black Diamond Express screws will take a "set" faster than anything else I use. By taking a "set", what I mean by that is the screw will generally catch the threads with a a single full turn at the wrist and stick in the ice so you can now employ the hanger's crank knob.


True, the Black Diamond screw is faster than the Grivel Helix on the "set".


But in a perfect world you have severalstepsto placing an ice screw, the "set", the wind and finally the clip.


If we have a "set", then the wind and finally the clip to eachscrew placement theneach step is equally important to me. On difficult climbing how long it takes me to fully place a screw defines how many screws I will place. I can decide to place screws inseveral ways. The first is by the difficulty of the climbing. I place screws often because I am likely to fall off at any given moment. Thatis not how I like to climb on ice. Umbilicals are my first line of defense so my preferred wayis to place fewer screws. It is an old habit I have from the days when screws were extremely hard to place. None of the screws available now have that unenviable reputation. So thescrews I do place better be bomber and take as little time as possible to get in. Time is a factor because if the climbing is difficult and steep, endurance and strength is always inquestion. I want to end the pitch strong enough to finish with a reserve. I don't want to ever fall on ice.


So from my own observations I thinkthat the BDExpress is the first screw to "set". If it only ended there the conversation would be over. Next up is the wind. So your screw is set and there is little fear of it launching into space unattended. You can now grab your winding knoband sink the screw to the hilt. Done. Almost finishedhere...snap a QD or slingbiner on. Thengrab your rope to make the final clip. And now you are off again climbingor just as likely, relieved,taking a mental break and shaking your arms with no risk of catching big air.


Whaaaoooo! Not quite that fast. There are a couple of steps we missed here. You likely are a smart climber so you racked all your Express screws with the winding knob up and open right? Well I don't. So I "set", then turn my winding knob up, (good place to kick a "free" screw loose into space), then I start to wind. Sink the screw, clip the screw, then clip the rope and finally flip the knob down. Gotta remember to flip that knob down. ( can't wait to hear how everyone else muddles through this better than me, as obviously many do:)


So easy to see my dilemma with a fast "bite" as oppose to a fast screw placement. I like the Express and own a rack of them specifically for hard alpine ice. They are lighter than anything available and they 'set" amazingly fast. But they don't placefast enoughto be my preferred screw onwater fall climbing.


*Since I am looking at thedetailshereI had forgotten this one. I think the offset hanger on the BD screws encourages you to start the wind off center to the axis of the screw. So you get a wobbly start if you are notvery careful. Obviously you can over come this with practice. But for the newbie or gumbie like myself it is annoying. The hand position on the Helix (at least for my XL size hands) naturally encourages you to be more centered to the axis of the screw on your *set*. That alone almost makes up for the better design on the BD teeth imo. And in practice makes the *set* on the Helix almost as fast, if not as fast, as the BD screw for me.


What I would liketo see is the BD tube and teethwith a totally new hanger. No knob to futz with, but a big winder, a hanger that naturally centers your hand for a straight drive on the *set* and keep the BD weight advantage.Easy enough to do. BD has the technology in house right now for a hanger as I described it. I had come to the same conclusion last winter just got there from a totally different train of thought. Not likely to happen any time soon though :) No one convinced it is needed except me.*


Damn, just wish my own screw of choice"set" that fast though......gotta think some more on this :)


Jeff again, on the 5th pitch, STH, Provo Canyon

More here on the BD Express screw:http://coldthistle.blogspot.com//01/be-attentive-when-placing-ice-screws.html

Saturday, September 21, 2013

James Joslin :: 1837 Land Purchase

The earliest record found so far for James Joslin in Whitley County, Indiana is his purchase of land from the U. S. government on September 20, 1837 and which was patented on August 20, 1838.

In September .. a distant cousin, Richard Kutz, sent me copies of the land entry files he had received from the National Archives. The Original Patent Records can be searched and viewed online at the General Land Office Patent Search site but only the patent record is available online. The land entry file for James Joslin included the application for purchase as well as a receipt for payment.

A portion of the left side of the application for land purchase is cut off. I've added what I think it should say in square brackets. Text displayed in bold face is written on the application, the other text is printed.

Land Office, Fort Wayne, Ia. Sept 20 1837

I, James Joslin, [of] Delaware County, Ohio do hereby apply for purchase E ½ NW ¼ Section numbered 25 in Township numbered 32 N. of Range number 8 E. containing 80 [acres], according to the returns of the Surveyor General, for which I have agreed with the Register to [pay] at the rate of One Dollar and Twenty-five cents per acre.
for James Joslin
Price Goodrich

I, Robert Brackenridge, Register of the Land Office, do hereby certify that the lot above de-[scrib]ed, contains 80 acres, as mentioned, and that [the p]rice agreed upon is one dollar and twenty-five cents per acre.
R. Brackenridge, Register.

The interesting thing about the land entry application is that the entry was signed by Price Goodrich "for James Joslin" indicating, perhaps, that James didn't make the trip to the land office. I wonder if he even saw the land before he purchased it or did he rely on Price to select good land? Also, did you notice the abbreviation "Ia." was used for Indiana?

This record also confirms the speculation noted by Irwin Joslin in his letter to my Grandmother on July 29, 1969 that James was "of Delaware County, Ohio" indicating that he was indeed living there, at least in 1837.

The receipt for payment is also dated September 20th 1837 and it shows that James paid $100 for his 80 acres.

The land purchase was not filed in Whitley County until October 14, 1885. It was found, after an extensive search, in Whitley County Deed Book 15, page 314. Two paragraph breaks have been added to the transcription to make it a bit easier to read.

[page] 314 certificate No. 20721 } United States to James Joslin.
Filed Oct. 14" 1885 at 3 P.M.

The United States of America, To all whom these Presents shall come, Greeting: Whereas James Joslin of Delaware County, Ohio has deposited in the General Land Office of the United States a Certificate of the Register of the Land Office at Fort Wayne where by it appears that full payment has been made by the said James Joslin according to the Provisions of the Act of Congress of the 24th day of April, 1820, entitled "An Act making further provision for the sale of Public Land" for the East half of the North West Quarter of Section twenty five in Township thirty two North of Range Eight (8) East in the district of land subject to sale at Fort Wane Indiana, containing eighty acres, according to the official plat of the survey of the said Lands, returned to the General Land Office by the Surveyor General, which said tract has been purchased by the said James Joslin.

Now know Ye, That the United States of America, in consideration of the Promises, and in conformity with the Several acts of Congress in such case made and provided, Have Given and Granted and by these presents Do give and Grant unto the said James Joslin, and to his heirs, the said tract above described. To Have and To Hold the same together with all the rights, priviliges, immunities, and appurtenances of what so ever nature, thereunto belonging unto the said James Joslin and to his heirs and assigns forever.

In Testimony Whereof, I Martin Van Buren, President of the United States of America, have caused these letter to be made Patent, and the Seal of the General Land Office to be hereunto affixed. Given under my hand, at the City of Washington, the twentieth day of August in the year of Our Lord one thousand eight hundred and thirty eight and of the Independence of the United States the sixty third.

By the President: Martin Van Buren
By M. Van Buren Secy.
Jos. S. Wilson acting Recorder of the General Land Office
Ad interimRecorded. Vol 42 Page 127


A set of plat maps drawn from the "Original Land Entries of Whitley County, Indiana" was published in 1981 by Stuart Harter, Churubusco, Indiana. Below is the southeast portion of the drawing for Troy township. In the upper left corner of Section 25 is the land of James Joslin. Among his neighboring landowners were James Goodrich and Price Goodrich. In Section 22 is the land of Bela Goodrich and two more properties for James Goodrich. In Section 23 is the land of Ralph Goodrich which borders that of James Goodrich in section 22.

Of course, just because James Joslin purchased land in Whitley County does not necessarily mean that he ever actually lived in the county. There were land speculators back in those days too... but he wasn't one of those speculators.

Friday, September 20, 2013

Wednesday, September 18, 2013

Some Aid Practice ..

Since we were blessed with another nice (not raining) November day in Seattle, Adam and I decided to hit the north wall of the Mountaineers Clubhouse for some light aid practice. It had been over a year since I had been in aiders, leading or following, so it was shaking off the rust.

I geared up and led a pitch with a short traverse to the chains at the top. I continuous ran into problems the whole pitch with my easy daisies, not having cut them loose and occasionally clipping through them. These issues stayed with me at the anchor as I had to lower down and right to get on rappel. It wasn't pretty. Once I sorted all my issues, I rapped and Adam followed.

Adam started with difficulty until he sorted the easy daisies and got his jugging setup right. Then he cruised to the top and re-aided the traverse to the chains. He enjoyed it, but we didn't have time for him to lead a pitch, so we packed up and called it a day.

Monday, September 9, 2013

Looking NorthEast

From the Crest of the Sandias you can see Albuquerque but can look off to the northeast also.

Friday, September 6, 2013

Finishing What You Started

Fork Crown Finishing

"The hardest part of this for beginners is usually the cleanup," Mike said at the start. "It's a lot of filing. That's what breaks people."


"Oh," I said. "Well, that shouldn't be a problem. I've done filing."


Going into this, I was worried about many things. The measuring, the cutting, the alignment, the brazing. But filing I could handle. I thought back to my days of intaglio printmaking (etching on metal plates). The person who taught me insisted that everything had to be done from scratch and manually - from cutting sheets of metal to preparing the plates. The latter involved beveling the edges at just the right angle, then endlessly filing, sanding and buffing them until the bevels were perfectly even and smooth, polished to a mirror finish. His insistence on this level of prep work had more than a few students in tears before we even touched ink or got anywhere near the press. But for some reason I stuck with it, eventually got the hang of it, and continued to use this method after I began to work independently. It just didn't feel right to do it any other way. Now whenever I see an etching, I can't help but look at the edges in search for file marks. All of this is to say, the prospect of filing for hours did not frighten me.


Rack Mockup & Modification

So how do I explain what happened a week ago? I don't want to exaggerate it into some dramatic melt down, but it was certainly a low point. A very long day, throughout the course of which I grew increasingly quieter and less bouncy than I had been up to that point. This was supposed to be the last day. So maybe it was the discrepancy between having believed I was almost done, and discovering more and more little things needing to be finished. All these little things added up, and taken together amounted to a lot of work. Bridges, bottle cage mounts, eyelets, braze-ons for cable routing.I had been awake since 5:30am. By 5:30pm, I was so tired that I had a hard time focusing. By the time we mocked the whole thing up to make sure the wheels, tires, rack and brakes all worked together,I was no longer fully present. At this stage we decided that the frame was finished - "good enough." But the feeling of satisfaction or at least catharsis that I had expected at the end did not come.


At home later that evening I did nothing and thought of nothing, feeling utterly dejected. It wasn't until the following day that I could even get myself to look at my pictures of the finished frame. And then I finally felt something: panic. "Good Lord, how could I leave it like this? This is notfinished!" I could see smears of brass and silver. If I zoomed in closely enough, I could make out uneven surfaces. I had filed away at these areas, but apparently not enough. Mike had been right: like most first timers, I had flaked out on the cleanup. With horror, I imagined him powdercoating the frame as it was, uneven shorelines and all. Or, worse yet, putting the finishing touches on it himself, whilst chuckling "I knew the finishing would get her!" So I phoned him, trying to stay calm. He had not powdercoated the frame yet. And yes, fine, I could come over to continue working on cleanup. This put me in a fine mood.I showed up bright and early on a Friday morning full of energy.

Some Finishing Tools

Somehow I maintained that energy for an entire day of using nothing but some files and emory cloth strips. All I did from 9:30am until 5:30pm, with a break for lunch, was file and sand, and it was tremendously satisfying. I guess having reached that low point my previous time at the shop, there was nowhere to go but up.


Mike had to go out for much of the day, and I was mostly on my own working on this. Not being able to seek feedback (Does this part look even? Did I file too much in this spot?) added a new layer of excitement to the process. When he returned, I think he was pretty amused by how cheerful I was after being at this for hours.


Fork Crown Finishing

One of the trickiest parts to clean up was the area around the Grand Bois fork crown. Those curly-cues make it difficult to get the file into that little space and chisel away at the extra filler material without gouging the crown or blades in the process. It took me longer to get it to this state from this state, than it did to do the initial post-brazing cleanup. The trick is to dig into the shoreline build-up with the tip of a file, then angle the file just so to lightly and gingerly clean up the rest.


Finishing

But the most challenging part of all was the seat cluster. My beautiful seat cluster! We made the seat stay caps from scratch to look exactly the way I wanted; it was the coolest thing ever. But during brazing I got a bunch of silver all over the caps, and was now terrified that in cleaning them up I would ruin their perfect concave surfaces. So ever so lightly, I dug into the tiny bulges with the tip of a file, using the most delicate micro-movements I was capable of to remove the filler material but not the steel underneath, then polished with an emory cloth until I got the stuff off. This took a while!


And so it went.The pictures here show the frame close to the point where I stopped, but not quite there.I didn't have the energy for pictures by the time I was done.


Finishing

If you are wondering about the uneven looking surface from the sanding marks, they disappear after the frame gets sandblasted. The headlugs started out looking like this after brazing, then this, and eventually ended up as you see them above.


Don't get me wrong: The finishing on my frame still isn't "good" by real builders' standards. In fact I would not mind continuing to work on it, but unfortunately we are out of time. But at least now I can live with the state I left it in. And no matter how the bike turns out, I got the feeling of catharsis and closure I wanted out of the process. I learned how to build a bicycle frame (and fork!), from start to finish.